The Personal Cloud: your own asteroid in cyberspace
(Part 2: instructable)
By Joseph Wojowski, MATI Vice President
This article is posted with permission from Wojowski's Translation Technology Blog. It is a follow-up to "The Personal Cloud: your own asteroid in cyberspace," published on the MATI blog with permission in August 2015 from Wojowski's blog. Readers may benefit from reading that original article before attempting to follow the instructable below.
Difficulty level: Intermediate
This post is a follow-up to my previous post regarding personal clouds. While Tonido for Windows on a desktop or laptop works just fine, the power conscious might want a low-power alternative to keep their personal cloud online and always available. As a point of reference, the typical computer power supply for a desktop draws 22 Amps at 5 Volts. In contrast, the Raspberry Pi 2 (herein RPi) draws 1.8 Amps at 5 Volts.
Assuming you have certain peripherals already, you should be able to set up your RPi powered cloud server for about $60. Here are all the things you will need:
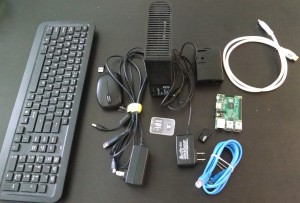
All of the items you will need.
Hardware items you likely will not have or will not have spares to dedicate to full-time usage.
Hardware items you may already have in your living/work space.
- USB Mouse and Keyboard set
- HDMI cable
- Ethernet cable (this item may be replaced by a USB WiFi dongle after initial set up, but setting up the system like this will not be described in this post)
- USB SD Card Reader
- External Hard drive with independent power source
Estimated time: 1 hour depending on internet speed and familiarity with UNIX-based systems.
To start out, take the RPi and place it in its case. Plug in all the cables (including the HDMI to a receiving monitor/television) except for the micro USB plug for power.
Get your software lined up and download Raspbian for the operating system (it will download as a .zip file; unzip it to your downloads folder; the resulting unzipped file will have the extension .dd), and rufus to create the bootable MicroSD Card (i.e. mount Raspbian onto the MicroSD so that the RPi unit can read it properly as a source for the Operating System).
Insert the MicroSD card into the card reader and plug it into a USB port on your computer (or directly into an SD slot with the adapter if you have a computer with an SD reader). When the MicroSD card appears on your list of devices with removable storage, right click on it and select format. Under File System, select FAT (File Allocation Table) if under 8 GB or FAT32 if above 8 GB. Unselect “Quick format” and rename the volume label if you like. Click start. (This could also be done in rufus alone, but I find that everything moves a long more smoothly if you format it to the file system you want separately.)
Once the disk has been formatted, open rufus, select the device from the dropdown list under device, FAT/FAT32 under file system. Next to “create a bootable disk using,” select “DD Image,” and next to that dropdown list, click on the icon which allows you to select an image. Navigate over to where the .dd image file is located; select, click open, and then click start.
After it does its thing, eject the disk from the computer and place it in the microSD card slot on the RPi unit. The old RPi units had a friction-fit SD Card slot where you just slid the SD card into the socket as far as it would go; in the RPi 1 Model B+, and the RPi 2, they replaced the friction fit SD slot with a push-push microSD slot – push the microSD card (metal contacts up) into the slot until it clicks and release. To remove, do the same.
Once the microSD card has been inserted into the unit, turn on the receiving HDMI display and plug the microUSB into the port and into the wall. Once you do this, the screen will show all the tasks the RPi is performing. The first time you start up the RPi, you will be brought to the Raspberry Pi Software Configuration Tool (which you can always access from terminal by giving the command for raspi-config) which is a GUI that you can navigate using the arrow keys and “enter.” Select option 3 “Enable boot to Desktop/Scratch” and then the second option, “Desktop Log in as user ‘pi’ at the graphical desktop.” Once you select that option and hit “enter,” you will be brought back to the main menu. Now, go to option 4, “Internationalisation Options.” For US, Go to “Change Locale” and with the spacebar, unselect en-GB and select en-US-UTF-8. Hit Enter. Next go to “Change Timezone” and select your timezone by largest nearest city, “Chicago” for me. Lastly for Internationalisation Options, select “Change Keyboard Layout” and change to your keyboard’s layout. Go down to the eighth (8th) item to select “Advanced Options.” At this menu, go down to A0 Update and hit “enter” and the RPi will use network connection to retrieve any available software updates – just let it do its thing. Once that has finished, select <Finish> at the bottom of the main configuration screen and you will be led back to the regular RPi Text-based UI.
When you are presented with “pi@raspberrypi¯$” you can type sudo reboot and the RPi will reboot itself, applying the changes to the configuration–it should be noted that if ever you are asked for a username or password, the default username is “pi” and the default password is “raspberry.” When the RPi reboots, it will boot directly into the Desktop GUI Environment.
Once the RPi has rebooted, open the LXTerminal and input the following commands (each line is separated by hitting Enter).
sudo mkdir /usr/local/tonido
cd /usr/local/tonido
sudo wget http://patch.codelathe.com/tonido/live/installer/armv6l-rpi/tonido.tar.gz
sudo tar -zxvf tonido.tar.gz
./tonido.sh start
Next, in a separate LXTerminal window, type in: ip addr show eth0
Open the web browser and access Tonido by going to https://<RPi IP Address>:10001
Replace <RPi IP Address> with the one given after inet from the second LXTerminal window.
Then, you will be allowed to create your username and password. Once you have done that, you can click on “Settings” and then “Misc” where you can choose which folders to which you would like to allow remote access.
When that is complete, you can unplug the HDMI cable and leave the unit where it is while it runs Tonido. The great thing about this service is that just like with other personal clouds, you can access your files from a web browser or you can also mount it as a drive in Windows, access items from your mobile device using the application, etc.
And one last item, do not ever worry about messing up anything in the software of the RPi. If ever something does not work like it should, all you have to do is re-format the MicroSD card and start over again. The glories of working with a Raspberry Pi!
For more information regarding Tonido and the Raspberry Pi including instructions on how to set Tonido to start automatically on boot, visit http://www.tonido.com/support/display/docs/Raspberry+Pi
Joseph is the Vice President of MATI; Director of Operations at Foreign Credits, Inc. in Des Plaines, IL; Chief Technology Officer at Morningstar Global Translations; and a Certified MemoQ Trainer.